

By theSTEMpedia Visit Website Follow
More by the author: A Scratch Based Graphical Programming Software" width="" />


About: STEMpedia is a place bringing project-making tools at one place- kits, online courses, coding platforms, controller app and tons of free learning resources. More About theSTEMpedia »
Do automated doors fascinate you just like us? Then, here’s something for you! This project on the DIY automatic door opening and closing system is a simpler version of the automatic doors that you find at malls. Our automatic door will use an IR sensor to detect presence and servo motor to open and close. The evive Starter has all the components that we’ll need to make your own DIY automatic door opening and closing system. And to program it, we’re going to use PictoBlox! You can download it from HERE.
Ready to make your own version of an automatic door? Let’s begin!
Hardware
Software
Note: Allthe above electronic component is available in the Arduino Based Robotic Kit names evive Starter Kit. The kit has a wide variety of usage when it comes to versatility as there is a number of projects made using it.
As we will be implementing the Automatic Opening and Closing System in the mini house.
Thus, instead of creating an entire 3D house, we will just build the front face i.e. the facade of the house.
Note: You can even make the entire house if you want too. :)
For making the facade, take a print out of your dream house image. If you are an artist, you can draw the house all by yourself. (Fig 1)
We need our house to stand strong on its ground. Glue the image on a corrugated sheet. (Fig 2)
Note: You need a hard material, to hold it up. Thus, you can even glue the image to the cardboard too,
With this the facade of the house is ready! :)
As we are going to automate the door. Thus, we need to make the door in our facade first.
As our image already has the door drawn on it, we will just cut along its edges.
Cut along three sides of the door using a cutter. This is enough to make the door open and close but not smoothly.
Thus, create a slit from the backside for the fourth side. Make you don’t cut both the layers of the corrugated sheet while making the slit on the fourth side. (Fig 1)
We have created a hinge structure for our door, which makes the door opens and closes smoothly.
We will be making the Automatic Door that will open and close automatically upon sensing our presence.
To make our presence sensed, we are going to use the Infrared Sensor (IR Sensor).
The infrared (IR) sensor a proximity sensor, or a ‘nearness’ sensor that senses whether an object(in our case, us!) is near it or not. If yes, the sensor will turn ON; if not, it will remain OFF.
Before using the IR Sensor, let's first test it!
evive- Arduino Based embedded platform makes testing and debugging simple. To debug any electronic component, Pin State Monitor is used. And evive has an inbuilt pin state monitor, thus, just connect the IR sensor (fig 1) and follow the below set of steps:
You may notice that as soon as you bring your hand close to the IR Sensor, the value next to pin 2 changes to 0 and if the hand is away it changes back to 1 as shown in the GIF above.
Note: If the IR Sensor is not working perfectly, calibrate the IR Sensor by following the steps given here.
Once we have tested the sensor, we need to now install it in our house.
As we need the Proximity Sensor to sense our presence as soon as we approach the door, we will be attaching it near the door.
Create a small hole in front of the house near the door. Place the Proximity sensor in such a way that both its LEDs i.e. Signal LED and the Power LED is in front of the house. Glue the IR Sensor there. (Fig 1 and 2)
With this our presence is detected, follow the next steps to do what to do to make the door open and close automatically.
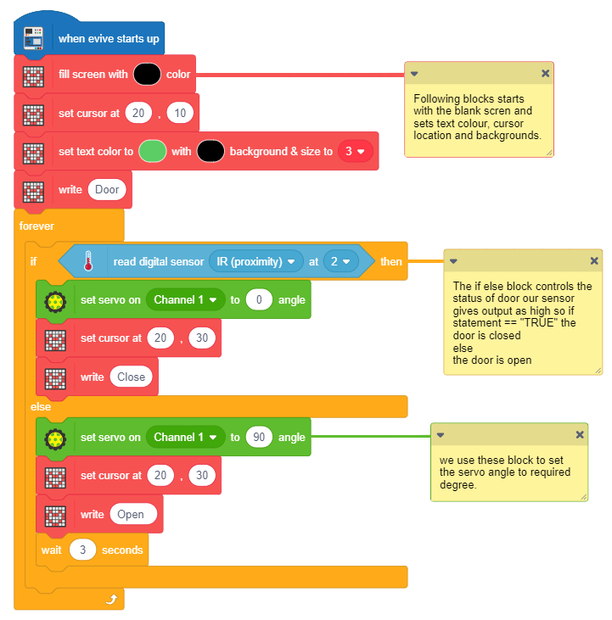
Now, we need that our automatic door should open as soon as the signal Digital Pin reads 0. We will use the servo motor to do so.
As soon as Digital Pin reads 0 the servo should turn 90 and when it is 1 then the servo should return to its initial position i.e. 0 degrees.
Similar to the testing of the IR Sensor, we will set the servo angle first to 90 using evive.
Set the Servo to 0 degrees first so that the door should always be closed.
As the servo will be attached to the wall and the servo horn will make the door to open close. We are going to use a paper clip to connect the servo horn to the door.
To make the base, take the corrugated sheet of size 30 cm x 30 cm and mark a line a few centimeters away from one of the edge.
Apply hot glue on the line drawn and glue a thin strip of the corrugated sheet of width 3 cm on it. This will give support for the face of the house. (Fig 1)
Now, to this strip, attach our facade using hot glue. (Fig 2)
With this, our structure of Arduino Based Automatic Door is ready.
Make the connections of the IR Sensor and Servo Motor as given below:
To make the project simpler we are going to write the code in PictoBlox, the graphical programming software for based on Scratch Blocks.
Upload the following code to evive.
Download both the PictoBlox and Arduino code file from below: